How to Monitor Application Smartly by using Laravel Telescope
-
 Nov 19, 2020
 - Laravel
Considering the immense popularity of the Laravel application among developers with the exemplary features it offers to the users. Every user is always looking for smarter ways to create websites and seeking new innovations in Laravel technology that will allow users to deliver better end results. So, we found one of the most popular frameworks Laravel has advanced its features by adding a smart monitoring solution in the application which is named as Laravel Telescope.
From a Laravel developer’s point of view, for every large system, the debugging time can be high and tedious. But with Laravel new edition- Telescope fills the gap in the development workflow and it helps to develop Laravel applications conveniently and rapidly. Laravel is already extremely popular among Web developers because of the features it offers and now with the addition of the telescope tool in it, they have provided the most complete ecosystem in the industry.
It assists thoroughly to debug both the criteria
Case 1- When we are building the projects
Case 2- When we need additional support for existing websites.
It gives access to a variety of information about the system like queries executed, commands run, views loaded, cache data, exceptions generated and so on. It is a complete debug environment for your applications.
1. How will customers benefit from Laravel Telescope
The Laravel development team work hard to provide clients a high-performing, scalable and optimized website with codes that work effortlessly without any issues. With the laravel telescope, the users no longer have to spend extra hours debugging websites and understanding how and what is blocking the code in implementation. They execute faster and hence provide quick resolutions under untimely circumstances, where if something needs to be fetched.
Installation
The documentation to install telescope laravel is available at Install Laravel Telescope. But In Windows 10, occasionally you may face issues listed as below.
Errors in Windows 10
- Installation: composer require laravel/telescope

- Migrate: $php artisan migrate
Nothing to migrate. - Publish: $php artisan telescope:publish
Unable to locate publishable resources. Publishing complete.
Our team of Laravel developers has found the solution for the outcome of this problem.
Solution:–
- Copy the project_folder\vendor\laravel\telescope\stubs\TelescopeServiceProvider.php to project_folder\app\Providers\
- Add constant TELESCOPE_ENABLED=true to .env file
- Then re-run commands at point 2 and 3.
To check that telescope has been installed successfully, start up the application, enter php artisan serve and enter http://127.0.0.1:8000/telescope will open up as below:

Configuration
The telescope config file is located at config/telescope.php
All the options like path, storage, watchers, etc information are included here. If any particular command or package is supposed to be ignored in the watcher, it has to be mentioned here. If the path needs to be accessed then the telescope is to be updated, and that can also be performed in the config file with a separate option for it.
2. Understanding the Laravel Telescope
Let us explore the different sections of telescope
Requests
It Laravel Telescope gives detailed information of all the requests coming to the application.

Opening any request provides information about the request parameters, headers set, response received as shown here


The authenticated user information is also available on the tab.

Commands
It lists all the Artisan commands run.

Know more about Laravel PHP framework for web artisans
Clicking on the eye icon lists the arguments, options and events related to the php artisan migrate command.

Schedule
Most of the time, we need to execute a few tasks periodically from the application. For this, we create crons and schedule them to run at a pre-defined time. This section lists all those commands and the output of those scheduled tasks.
Jobs
In case we need to create jobs which need to be executed later after the Laravel Telescope has completed its implementation then there should be a follow up email a day later. The time consumption can be higher if the user is preparing a zip backup of files. These database queries queued jobs are put into queues which take care of monitoring and running them according to the order they are received. All these jobs are listed here.

Exceptions
All the exceptions thrown in the application can be viewed here. Gives the location and stack trace as well to find the underlying reason behind the exception.

Logs
It lists different types of log entries database queries like errors and application exceptions log entries? , warnings, info, alerts and so on that are added by the application. This makes it easier to view than to search in the files located in the storage/logs directory.

Dumps
Several times when debugging the application, on facing any issue, we need to check the variable or object or any data. Using the dump() method and keeping the Dumps page
Open in the Laravel Telescope, the output is visible here.

Views
Lists all the views that have been loaded throughout the interaction with the system. Clicking on the eye icon also details the data that has been loaded through the view.

Queries
One of the most important sections that come in handy anytime is the Queries section. All the queries executed in the system along with their duration are listed here. This helps in knowing all the queries which took longer time to execute and hence needs to be updated to increase the page speed and overall usability of the application.

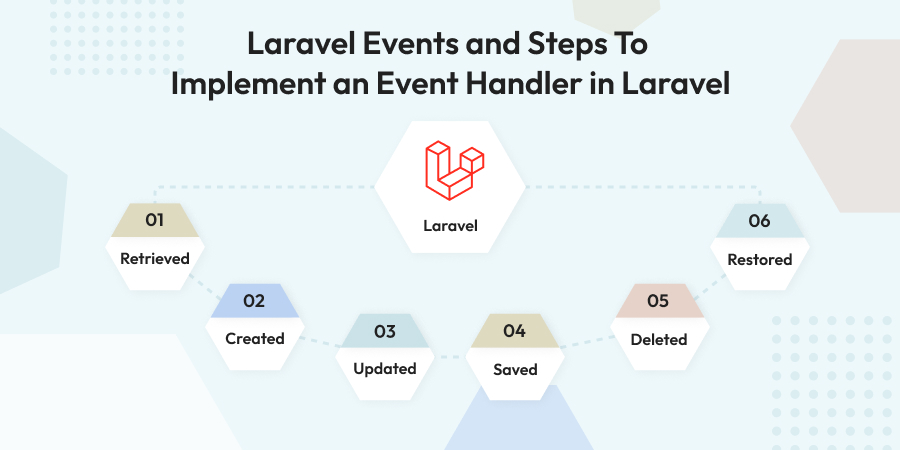
Models
It lists all the model changes i.e. whenever any created, updated, restored or deleted event occurs.

Events
This section lists all the events of the system along with the listeners information associated with it.

Lists all the mails that were sent from the system like number of recipients, time of the email sent, subject and also gives a preview of email for better understanding.

Notifications
Laravel provides an in-built feature to send notifications through different channels like Mail, Slack, Database and SMS. All the mail sent notifications from the system are listed here.

Gates
Several times, we need to restrict users to perform any action based on their role. For this purpose, we create gates at app/providers/AuthServiceProvider which takes care of authorization. This section lists the gates and the result of those gates.

Cache
It shows a list of cache hits, misses, updates, etc. Also, details about the request leading to each cache condition.

3. Restricting access to telescope
In the local environment, any user will be able to access the Laravel Telescope. In a production environment, if we want any specific user only to access it, this is possible using the gate function at app/Providers/TelescopeServiceProvider where the email address needs to be added here. and multiple emails can be entered.

Prune
All the entries of the laravel telescope data are stored in the telescope_entries table. Now, this table can get accumulated easily. If you want to reduce this then run the prune command.
$schedule->command(‘telescope:prune’)->daily();
This command needs to be added in the app\Console\Kernel.php file. It will remove all entries before 24 hours.
If we need to specify the exact hours at which the data should be pruned, it can be done using hours option $schedule->command(‘telescope:prune –hours=12’)->daily()
OR
$schedule->command(‘telescope:prune –hours=12’)->hourly()
Tagging
Sometimes we would want to search for those requests that return 500 error Or
We would want to search for requests related to some specific user. This is also possible using the tagging concept in the ‘telescope’ tool.
Telescope::tag method needs to be added in the register function of TelescopeServiceProvider which will return those requests that are requested.
The other way to add tags On telescope UI is by clicking on the monitoring button, it will allow you to add any tag like Auth:1 and after that, only requests related to the tags will be monitored.
Once done, un-monitoring the button will continue to log requests as it was happening earlier.
4. Conclusion
Throughout the blog, we saw some of the cutting-edge exceptional features that Telescope provides and by installing it in your application you can definitely have an additional competitive edge and make task processing easier and faster. We would advise you to use a telescope in all your projects in order to leverage the benefits and stay ahead of the peers of the market.
Websites are like virtual gateways to your business profitability. Businesses are extremely cautious while deciding to develop one that has the potential to accelerate opportunity....


Comments
Leave a message...