Laravel Events and Steps to implement an Event Handler in Laravel
-
 Nov 30, 2018
 - Laravel
1. Laravel Events and Listeners: Brief Introduction
When it comes to implementing Laravel’s event, the process is very simple and easy. It also offers an understandable observer practice. Laravel events allow application users to listen and subscribe to different events that occur in the app. In this process, the event classes get saved in the folder – ‘App/Events’, and listeners get saved in the folder – ‘App/Listeners’. But with the latest Laravel development India approaches, these folders are not present in the project but are automatically created when the events and listeners are generated with the help of Artisan console commands.
In addition to this, there are events that assist in separating different aspects of the app. Each of these events has many listeners that do not rely upon each other. For instance, when you want to send an email or a notification to the user each time they purchase any service or product from your site, instead of writing a code of purchase processing to the code of notification, the Laravel app developers can easily develop an item purchase event, for which the listener can send and receive a notification or an email to the user.
What is Event Listeners?
A Listener is a very simple class that listens to all the events that are mapped and executed. Listeners are the ones that can easily perform any given task for an event. For instance, when you try to send a welcome email to a new user of your business application, and you also want to assign a role to the user as per his registration information, you would not prefer to do everything from the RegisterController as doing so will violate the first principle of SOLID. The principle says that the Controller is capable of performing more than one task while the RegisterController needs to only perform one task that is the activity to register a new app user. In this case, an event needs to be carried out while the registration process is going on so that the role assigning is done at the same time. But it consists of individual listeners under each event. Listeners can be assigned a role, sending an email, and more.
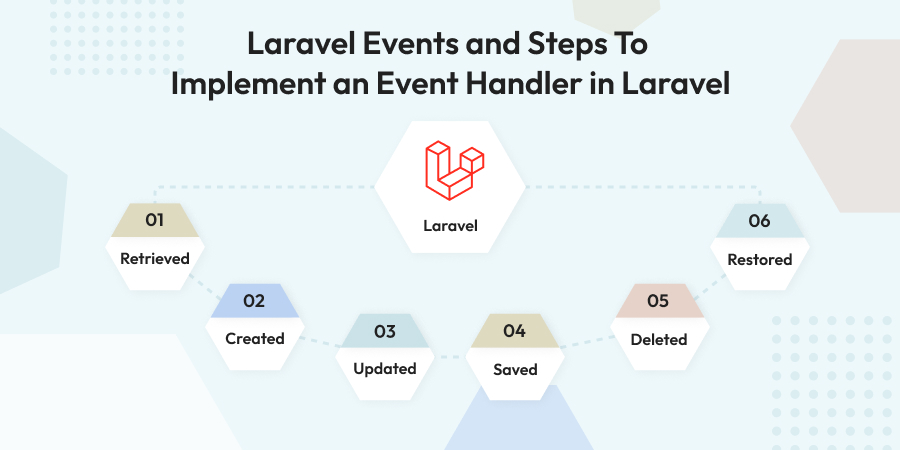
Example of Laravel Events
- A comment is added to the blog
- A new user register on our website
- A user may like or dislike the photos and more
- A user creates a blog post
2. Steps to Implement Event Handler in Laravel

Step 1: To Register Events & Listeners
To register your events, you need to open app/Providers/EventServiceProvider.php, you can find the protected listen property on the EventServiceProvider class. Look at the below code.
<?php protected $listen = [ 'App\Events\Event' => [ 'App\Listeners\EventListener', ], ]; ?> |
<?php protected $listen = [ 'App\Events\Event' => [ 'App\Listeners\EventListener', ], ]; |
The Listen array contains a list of events and listeners and you can add as many events in this array as your application requires. For an example let’s add User Registered event:
<?php protected $listen = [ 'App\Events\UserRegistered'=> [ 'App\Listeners\SendActivationCode', 'App\Listeners\AssignRole', ] ]; ?> |
<?php protected $listen = [ 'App\Events\UserRegistered'=> [ 'App\Listeners\SendActivationCode', 'App\Listeners\AssignRole', ] ]; |
Here, we have created the UserRegistered event so it will be triggered when any user registers. If you want to call some action on a newly registered user, you can call as many actions as you want. Here I have defined two actions one is SendActivationCode and another one is AssignRole. Let’s generate events and listeners.
Step 2: Generate your Events and Listeners
Manually generating the files for events and listeners is very painful. Instead, you can add listeners and events to your EventServiceProvider and run the event:generate command.
php artisan event:generate |
This command generates any events and listeners that are listed in your EventServiceProvider. Events and listeners which already exist will be untouched.
Step 3: Define Events and Listeners Class
Define Events
An event class is a data object which holds the information related to the event. For an example, please check below the created event class. UserRegistered event receives an Eloquent ORM object.
<?php namespace App\Events; use App\User; use Illuminate\Broadcasting\Channel; use Illuminate\Queue\SerializesModels; use Illuminate\Broadcasting\PrivateChannel; use Illuminate\Broadcasting\PresenceChannel; use Illuminate\Foundation\Events\Dispatchable; use Illuminate\Broadcasting\InteractsWithSockets; use Illuminate\Contracts\Broadcasting\ShouldBroadcast; class UserRegistered { use Dispatchable, InteractsWithSockets, SerializesModels; public $user; /** * Create a new event instance. * @return void */ public function __construct(User $user) { $this->user = $user; } } |
You can see that the event class does not contain any logic. SerializesModels trait will be used in the event to respectfully serialize any Eloquent models if the event object is serialized using PHP’s serialize function. Here we have passed a $user object to construct and that object will assign a $user variable to that class.
Defining Listeners
Now, let’s talk about listeners for our example event. Listeners will receive the event object in their handle method. The PHP artisan make:listener command will automatically create a proper class and type-hint the event on the handle method. Here I am creating two listeners for the UserRegistered event. I want to send the activation code to the user as well as assign a role to him. See listeners below.
<?php namespace App\Listeners; use App\Events\UserRegistered; use Illuminate\Queue\InteractsWithQueue; use Illuminate\Contracts\Queue\ShouldQueue; class SendActivationCode { /*** Create the event listener. * @return void */ public function __construct() { // } /** * Handle the event. * @param UserRegistered $event * @return void */ public function handle(UserRegistered $event) { \Log::info('activation',['user' => $event->user]); } } |
To call the event at the time of user registration, then you need to call this way.
Step 4: Create the Table and Migrate
Here you can create a migration file and after adding the columns that are required to be migrated, migrate the file using proper code.
Then you will be able to see the table in the database.
Step 5: Dispatch the Event
event(new UserRegistered($user)); |
Here, we have passed the $user object which will contain newly registered user data so it will help us to send the activation code and assign a role to him. Currently, I have written Log code when the event is called. So you can write your code there as per your event type.
<?php namespace App\Http\Controllers; use App\Events\OrderShipped; use App\Http\Controllers\Controller; use App\Models\Order; use Illuminate\Http\Request; class OrderShipmentController extends Controller { /** * Ship the given order. * * @param \Illuminate\Http\Request $request * @return \Illuminate\Http\Response */ public function store(Request $request) { $order = Order::findOrFail($request->order_id); // Order shipment logic... OrderShipped::dispatch($order); } } |
Reference for source code – https://laravel.com/docs/8.x/events#dispatching-events
To stop the action of an Event
If you wish to stop the event’s action to other listeners, you may need to do so by returning false from your listeners.
3. Conclusion
In this blog, we learned about event class and listeners and also went through steps that help Laravel developers to implement the event handler in Laravel 5.x development. I hope the article cleared your concept about this topic and you can implement these steps in your Laravel application.
NodeJS community has recently released the newest version of Node, which is 10.0. This version will become a Long-Term-Support line in October 2018 and LTS...
Comments
Leave a message...