Build a Shopify App with Node.js
The whole world is moving to the eCommerce store and selling products online. And nowadays, People are moving to Shopify for eCommerce online store as it is having user-friendly admin template, Shopify full-fledged paid and non-paid themes.
There are many functionalities which client need to be integrated into Shopify store which are not provided in the Shopify default features.
To integrate such features which we need to integrate from Shopify’s out of the box. Shopify allows us to do the same using custom apps or Shopify’s default app available in the Shopify app store https://apps.shopify.com/.
Here are the steps to create the custom app in Shopify using node js.
- Install Node js
Mainly used to develop server-side and networking applications, Node.js is an open-source, cross-platform runtime environment that needs to be installed in prior.
If Node js is not installed in your pc you can download from here.
Note* : We need to use node version 8.1.0 or later
To check the node version run below command
Command : node -v (To get the node js version)
If it is not the version mentioned we need to update node js using below command
Command : npm update
After installing below are some node packages which are mandatory to install before building app in Shopify
- nodemon (Optional – As this package is to view the changes instantly)
- cookie
- dotenv
- body-parser
- mysql
- shopify-api-node
- crypto
- nonce
Command : npm install nodemon cookie dotenv body-parser mysql shopify-api-node crypto nonce –save
- Create a project folder and index.js file
Command : npm install
Code for index.js file
const crypto = require('crypto'); const nonce = require('nonce')(); const request = require('request-promise'); const querystring = require('querystring'); const cookie = require('cookie'); app.get('/shopify', (req, res) => { const shopName = req.query.shop; // Shop Name passed in URL if (shopName) { const shopState = nonce(); const redirectUri = process.env.TUNNEL_URL + '/shopify/callback'; // Redirect URI for shopify Callback const installUri = 'https://' + shopName + '/admin/oauth/authorize?client_id=' + process.env.SHOPIFY_API_KEY + '&scope=' + process.env.SCOPES + '&state=' + shopState + '&redirect_uri=' + redirectUri; // Install URL for app install res.cookie('state', shopState); res.redirect(installUri); } else { return res.status(400).send('Missing shop parameter. Please add ?shop=your-development-shop.myshopify.com to your request'); } }); app.get('/shopify/callback', (req, res) => { const { shopName, hmac, code, shopState } = req.query; const stateCookie = cookie.parse(req.headers.cookie).state; console.log(shopState + stateCookie); if (shopState !== stateCookie) { return res.status(403).send('Request origin cannot be verified'); } if (shopName && hmac && code) { const map = Object.assign({}, req.query); delete map['signature']; delete map['hmac']; const message = querystring.stringify(map); const providedHmac = Buffer.from(hmac, 'utf-8'); const generatedHash = Buffer.from( crypto .createHmac('sha256', process.env.SHOPIFY_API_SECRET) .update(message) .digest('hex'), 'utf-8' ); let hashEquals = false; try { hashEquals = crypto.timingSafeEqual(generatedHash, providedHmac) } catch (e) { hashEquals = false; }; if (!hashEquals) { return res.status(400).send('HMAC validation failed'); } const accessTokenRequestUrl = 'https://' + shopName + '/admin/oauth/access_token'; const accessTokenPayload = { client_id: process.env.SHOPIFY_API_KEY, client_secret: process.env.SHOPIFY_API_SECRET, code, }; request.post(accessTokenRequestUrl, { json: accessTokenPayload }) .then((accessTokenResponse) => { const accessToken = accessTokenResponse.access_token; const shopRequestUrl = 'https://' + shopName + '/admin/api/2019-07/shop.json'; const shopRequestHeaders = { 'X-Shopify-Access-Token': accessToken, }; request.get(shopRequestUrl, { headers: shopRequestHeaders }) .then((shopResponse) => { res.redirect('https://' + shopName + '/admin/apps'); }) .catch((error) => { res.status(error.statusCode).send(error.error.error_description); }); }) .catch((error) => { res.status(error.statusCode).send(error.error.error_description); }); } else { res.status(400).send('Required parameters missing'); } }); app.listen(3000, () => { console.log('Application listening on port 3000!'); |
- Install Ngrok to create a tunnel from the public internet to your local machine
As the Shopify need SSL to make API Call. Ngrok provides the same with the SSL URL that will point to the localhost.
Using ngrok we can easily connect the localhost with Shopify using SSL
You can download ngrok from this URL
After downloading .exe file run below command from ngrok.exe.
Command: ngrok
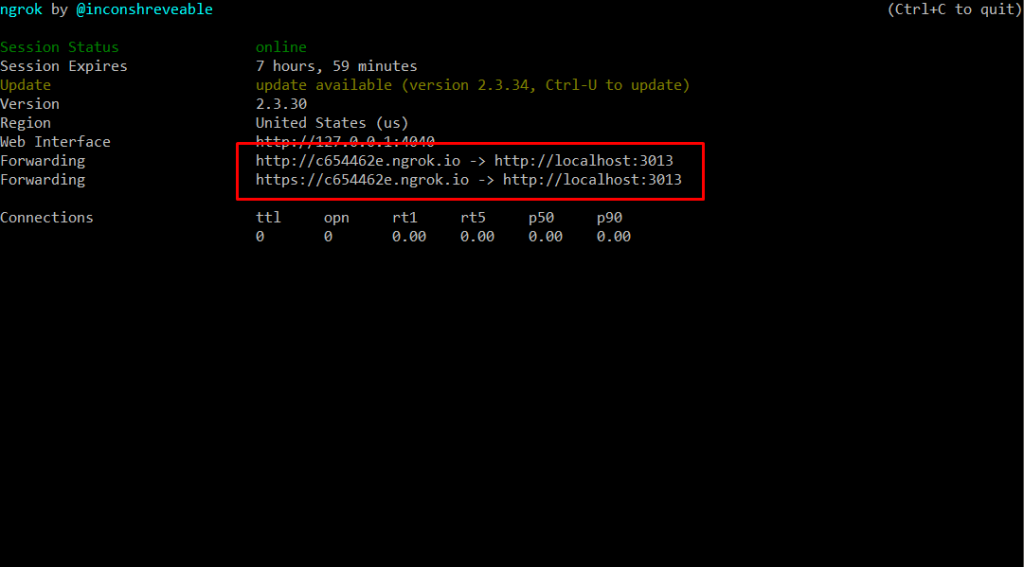
You will get the following o/p where you get the ngrok URL with (https) as highlighted in the screenshot
- After that login to your developer account to create an app

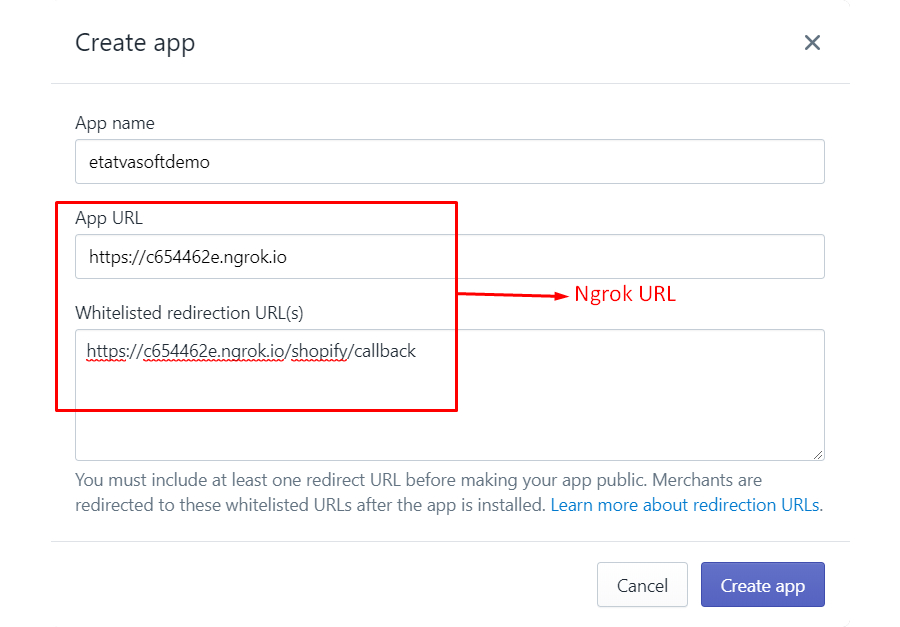
Click on create app and popup will appear. Where you need to enter the name of the app and ngrok URL with (https://) generated in the above step.
Place ngrok URL with (https://) in-app URL and keep the same with the /Shopify/callback in whitelisted redirection URL(s).
- After creating the app, We will need shop API key and secret key to authenticate app which we will get from app setup

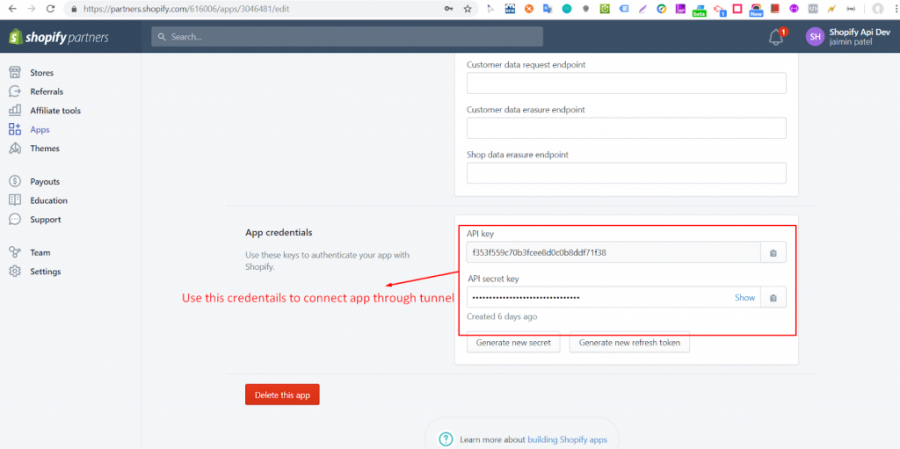
- Use the same credentials in .env file to set the general constant where we need to update the Shopify API key and secret key which we will use in the code of index.js file.
The SHOPIFY_API_KEY will be the API key as per the above screenshot and SHOPIFY_AP_SECRET will be the API secret key as per the above screenshot.

- After that use the ngrok URL with the shop name in shop param like below and enter

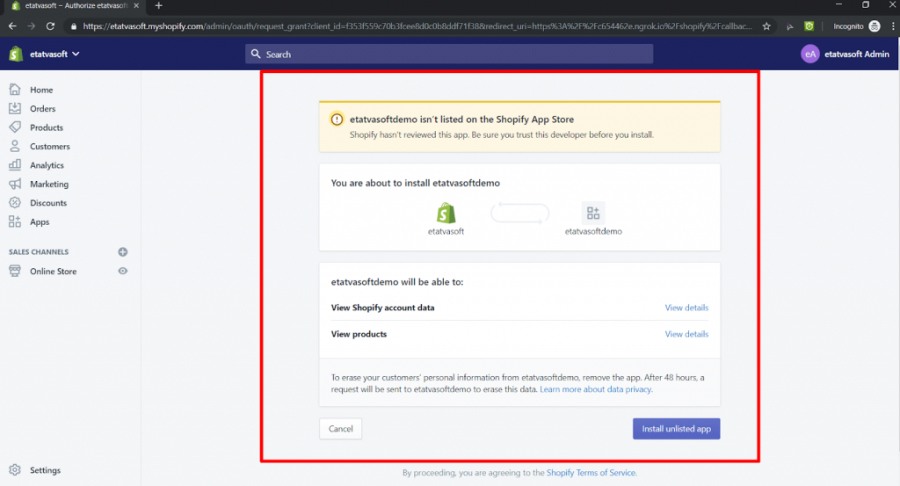
Click on install unlisted app to install the app in Shopify admin.
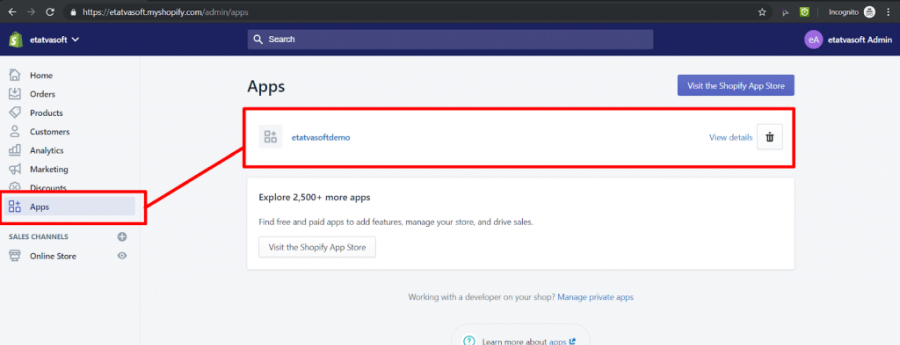
Just follow the above steps to create a custom APP using node JS.
Angular is one of the best open-source JavaScript frameworks for building mobile and desktop web applications. ...
 May 19, 2020


Comments
Leave a message...