React Native community is growing rapidly and we learn day by day that it’s possible to build a cross-platform application with rich UI usability. Facebook team has done a great job of implementing a lot of UIKit component out of the box but made it easy for us to add it one of our own native components and use it in React for mobile development.
There are two types of custom components that we can implement for React Native Applications Development, UI and Utility. For this article, we’re going to focus on the UI. We will take a native UIButton and expose it as React Native custom components. You will be able to set the button label and attach a handler for when it is tapped.
Implementation Steps:
-
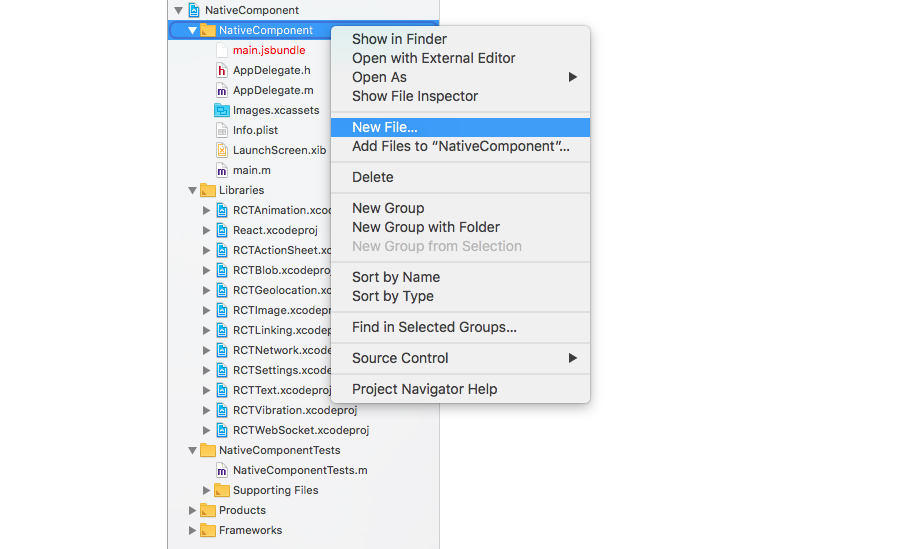
- Open the iOS Project in Xcode. The project file is located in the iOS/ directory of your React Native app development (i.e. /NativeComponent/ios/ NativeComponent.xcodeproj).
- Select and right-click on the group that matches your project name and click on New File:
-
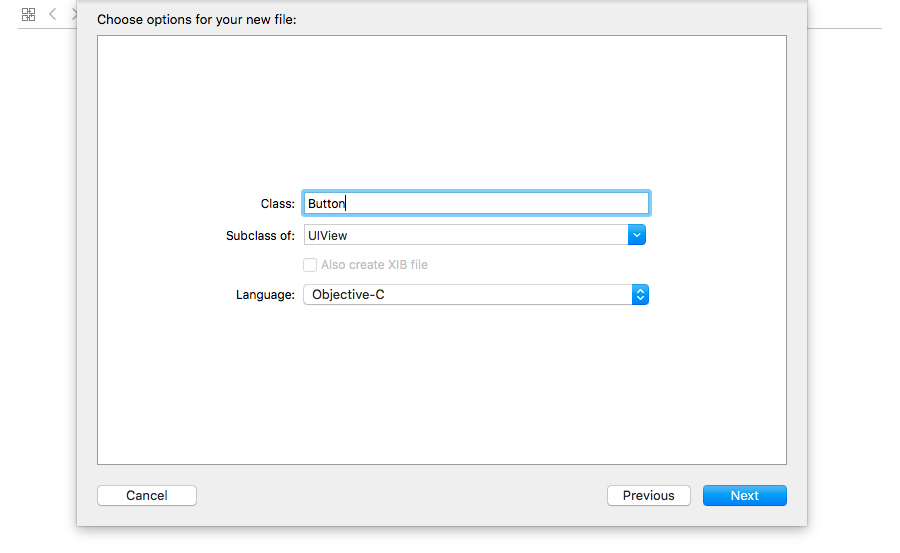
- Select Cocoa Touch Class and click Next.
- Enter Button for Class name and set the Subclass of as UIView and Language as Objective-C.
-
- Click Next and then you will have to choose into which directory you would like to place your new class. Double-click the NativeUIComponent directory to create the class.
- Repeat steps 2-5 with for creating multiple ButtonViewManager as the class and RCTViewManager as the subclass.
- First, implement a Button UI class. In the header (Button.h) file, we will add an onTap property to wire up our tap event:
#import <UIKit/UIKit.h>
#import "RCTComponent.h"
@interface Button : UIView
@property (nonatomic, copy) RCTBubblingEventBlock onTap;
@end |
#import <UIKit/UIKit.h>
#import "RCTComponent.h"
@interface Button : UIView
@property (nonatomic, copy) RCTBubblingEventBlock onTap;
@end
-
- Next, open up the implementation file (Button.m). Here it will start off by creating references for our UIButton instance and the string that will hold the button label:
#import "Button.h"
    	#import "UIView+React.h"
    	@implementation Button {
    	  UIButton *_button;
    	  NSString *_buttonText;
} |
#import "Button.h"
#import "UIView+React.h"
@implementation Button {
UIButton *_button;
NSString *_buttonText;
}
-
- The bridge will look for a setter for the buttonText property, in which will set the UIButton instance title field. Add the following setter to your class:
-(void) setButtonText:(NSString *)buttonText {
    	  NSLog(@"Set text %@", buttonText);
    	  _buttonText = buttonText;
    	  if(_button) {
    	    [_button setTitle:
            buttonText forState:UIControlStateNormal];
    	    [_button sizeToFit];
    	  }
} |
-(void) setButtonText:(NSString *)buttonText {
NSLog(@"Set text %@", buttonText);
_buttonText = buttonText;
if(_button) {
[_button setTitle:
buttonText forState:UIControlStateNormal];
[_button sizeToFit];
}
}
-
- The other part of the arguments our button will accept is the onTap event handler. It needs to wire this to our UIButton instance through an action selector:
- (IBAction)onButtonTap:(id)sender {
    	  self.onTap(@{});
} |
- (IBAction)onButtonTap:(id)sender {
self.onTap(@{});
}
Finally, we need to instantiate the UIButton and place it inside a React Subview:
-(void) layoutSubviews {
    	  [super layoutSubviews];
    	  if( _button  == nil) {
    	    _button =
    	    [UIButton buttonWithType:UIButtonTypeRoundedRect];
    	    [_button addTarget:self action:@selector(onButtonTap:)
      	  forControlEvents:UIControlEventTouchUpInside];
    	    [_button setTitle:
    	    _buttonText forState:UIControlStateNormal];
    	    [_button sizeToFit];
    	    [self insertSubview:_button atIndex:0];
    	  }
    	}
    	- (void)insertReactSubview:
        (UIView *)view atIndex:(NSInteger)atIndex
    	{
    	  [self addSubview:view];
    	}
    	- (void)removeReactSubview:(UIView *)subview
    	{
    	  [subview removeFromSuperview];
    	}
     - (void)removeFromSuperview {
    	  [super removeFromSuperview];
} |
-(void) layoutSubviews {
[super layoutSubviews];
if( _button == nil) {
_button =
[UIButton buttonWithType:UIButtonTypeRoundedRect];
[_button addTarget:self action:@selector(onButtonTap:)
forControlEvents:UIControlEventTouchUpInside];
[_button setTitle:
_buttonText forState:UIControlStateNormal];
[_button sizeToFit];
[self insertSubview:_button atIndex:0];
}
}
- (void)insertReactSubview:
(UIView *)view atIndex:(NSInteger)atIndex
{
[self addSubview:view];
}
- (void)removeReactSubview:(UIView *)subview
{
[subview removeFromSuperview];
}
- (void)removeFromSuperview {
[super removeFromSuperview];
}
-
- Now we need to implement our ButtonViewManager, which will interface with our React Native application. Open up the implementation (ButtonViewManager.m) file and add the following:
#import "ButtonViewManager.h"
#import "Button.h"
#import "UIView+React.h"
@implementation ButtonViewManager
RCT_EXPORT_MODULE()
- (UIView *)view {
Button *button = [[Button alloc] init];
return button;
}
RCT_EXPORT_VIEW_PROPERTY(buttonText, NSString);
RCT_EXPORT_VIEW_PROPERTY(onTap, RCTBubblingEventBlock);
@end |
#import "ButtonViewManager.h"
#import "Button.h"
#import "UIView+React.h"
@implementation ButtonViewManager
RCT_EXPORT_MODULE()
- (UIView *)view {
Button *button = [[Button alloc] init];
return button;
}
RCT_EXPORT_VIEW_PROPERTY(buttonText, NSString);
RCT_EXPORT_VIEW_PROPERTY(onTap, RCTBubblingEventBlock);
@end
-
- Let’s build out our UI to render this button. We’re going to need our Button in its own React Component. Create a Button.js file in your project’s root directory (where index.ios.js is located) and add the following code:
import React, { Component } from 'react';
import { requireNativeComponent } from 'react-native';
export default class Button extends Component {
render() {
return ;
}
}
Button.propTypes = {
buttonText : React.PropTypes.string,
onTap : React.PropTypes.func
};

var ButtonView = requireNativeComponent('ButtonView', Button); |
import React, { Component } from 'react';
import { requireNativeComponent } from 'react-native';
export default class Button extends Component {
render() {
return ;
}
}
Button.propTypes = {
buttonText : React.PropTypes.string,
onTap : React.PropTypes.func
};
var ButtonView = requireNativeComponent('ButtonView', Button);
-
- Open our index.ios.js file and add the following code after the import { … } from ‘react-native’ block: import Button from ‘./Button’;
Add the following to the class implementation:
componentWillMount() {
   	      this.setState({
   	        count : 0
  	       });
  		}

    	  onButtonTap = () => {
    	    let count = this.state.count;

    	    this.setState({
    	      count : count+1
    	    });
    	  }
    	  render() {
    	    return (

            	<button></button>
        	    Button Pressed Count: {this.state.count}

     	      );
} |
componentWillMount() {
this.setState({
count : 0
});
}
onButtonTap = () => {
let count = this.state.count;
this.setState({
count : count+1
});
}
render() {
return (
<button></button>
Button Pressed Count: {this.state.count}
);
}
Outcome
For this recipe, we exposed a basic native UI component. This is the same foundation of how all the built-in UI components (for example, Slider, Picker, ListView, etc) are built. The most important requirement in creating UI components is that your View Manager extends RCTViewManager and returns an instance of UIView. In our case, we are wrapping a UIButton with a React-specific UIView extension. This helps us with the layout and styling of the component.
 Sep 16, 2018


Comments
Leave a message...